HOW TO PLASTER A WALL - A BEGINNERS GUIDE

How to Plaster a Wall – A Beginners Guide
Are you ready to get into this step by step comprehensive guide to plastering and existing wall for beginners by somebody who does it every day!
Throughout my career as a plasterer I have been lucky to work with people who really knew what they were doing. I’ve been shown the right plastering tools to use, the correct ways to prepare a job, and more importantly, I’ve been shown how to put Gyprock a wall correctly and save time in the process!
But, if you are new to plastering or DIY and have no one to show you how to plaster a wall, what do you do?
Where do you start?
Getting a professional to do a job in your own home can be expensive.
Well, you CAN gyprock those walls and you CAN do it yourself!
I'm going to show you how to prepare and plaster a interior walls from scratch. Anyone can plaster a wall (yep, anyone), but you need to follow a method otherwise it will be time consuming and can result in a poor finish. You can’t just pick up a trowel and start throwing plaster around.
There are 3 main stages which I'll explain here:
- Knowing what plastering tools and general DIY tools to use.
- To correctly prepare the area of your internal walls for plastering (not getting this right can bring disaster).
- Plastering your walls.
There is a lot to learn here and my goal but by the end of this tutorial, is to have you ready to gyprock a wall.
Let’s go.
Part 1 – What specialist plastering tools and equipment do you need to plaster a wall or ceiling?
Before you start plastering you need the right tools. Like anything you do, you need to make sure you have the best tools for the job.
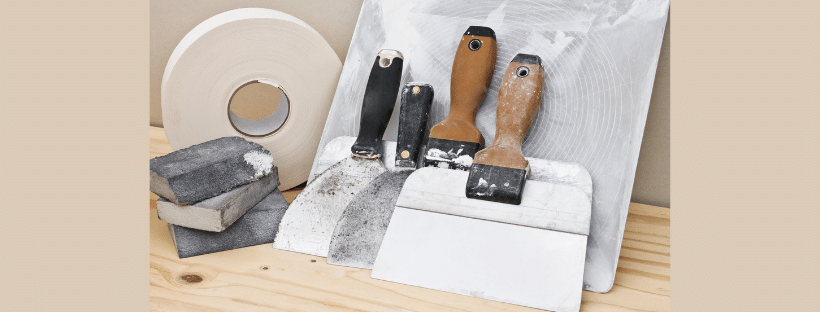
There are the 5 main tools you’ll need to start skimming. These are the basic tools you will need. As you become more proficient you will expand the range:
- Plastering trowel (preferably stainless steel)
- Bucket trowel
- Hawk/hand board
- Mixer
- Water brush
1) Plastering trowel
This is definitely the most important tool. The Plastering Trowel will have the greatest effect on your results.
You might hear a few old boys say that it doesn’t matter what trowel you use, “just get it on the wall!”
They are wrong!
You need a decent trowel, especially if you’re starting out. I recommend discussing this with the hardware people near you.
But generally you want one which is not too big and is made from stainless steel. They are lighter and easier to maintain, and are easy to use.
If you don’t want to pay for a stainless steel trowel just make sure you don’t buy the cheapest one. It won’t pay off and you will not get the results you deserve!
2) Bucket trowel
This one isn’t as important. The main function of this tool is to scoop the plaster from the bucket, onto your hawk (or hand board depending on where you’re from). You don't have to get the most expensive one of these.
You can buy a bucket trowel from most hardware shops – they’re not expensive but you definitely need one.
3) Plasterer’s hawk/hand board
This is another important one because this is the tool that holds your plaster. If you don't have a hand board you would have to throw the plaster at the walls!
There are many options but I believe the best one for beginners is a foam/plastic hawk.
They are are light and easy to use.
This is important when you are starting out as the plaster can get heavy on your forearms.
Imagine holding a hawk full of plaster all day while your other arm is skimming the wall.
Plastering can be very strenuous so if you can soften the workload even a little bit, you will be a lot happier.
Another reason for choosing a foam/plastic hawk is that they are generally quite cheap, the only downside being that they aren’t very strong. They won’t last forever but they’re perfect whilst you’re learning.
4) Mixer
Gone are the days where all we had for tools was a spade and a hammer.
Technology has enabled us to become much more efficient.
You need to invest in a decent plaster mixer.
It will mix the plaster in half the time and with little effort. It will also create a nicer, smoother mix.
5) Water brush
A good water brush is a crucial addition to your list of plastering tools.
It will keep your edges clean, allow you to splash water onto your plaster and will give your walls that perfect finish.
You could choose a cheaper brush but I suggest it pays to buy a slightly more expensive one.
A cheap brush will leave bristle on your wall, and can often be more trouble than it’s worth. That’s why I recommend investing in a real decorator’s brush.
I’ve had one for nearly 2 years and it’s showing no signs of wear. They can be a bit pricey but if is definitely worth the extra.
You will also need a brush to clean all your tools with. I usually use a good quality hand brush because they are often small enough to get in between the paddle of your mixer. Keeping your tools clean is one of the most important tasks in plastering. If you look after your tools and they will look after you.
These are the essential tools you will need to start your journey into the world of plastering. You will buy more but this in the minimum you should invest in.
What’s next?
Part 2 – Prepare your walls for Plastering
You have the tools, now you need to learn to prepare the area. When I was learning to plaster, my boss always had a phrase I still follow to this day: failing to prepare is preparing to fail.
I have seen full sheets of plaster fall to the floor due to a lack of respect for this part of the job. This is so crucial because getting this wrong creates so many problems.
That’s why I’m going to walk you through each step of preparation process to allow you have the perfect base for skimming.
There are four steps you MUST follow:
- Strip wallpaper
- Wash the walls down
- Scrim tape any cracks
- PVA/Blue Grit
1) Strip wallpaper
This is probably one of the most hated jobs in the history of man (painting skirting boards is another). Everyone knows that stripping wallpaper is very boring, hard work.
Unfortunately, it’s vital for preparing your walls.
This is what happens if you decide to plaster over paper: you apply the plaster to your walls and it all looks great. You apply the second coat and guess what? It still looks fine. However, the effects will start to show.
You might notice little bubbles appearing in the plaster. Then you might notice parts of the plaster falling onto the floor. Slowly but surely your hard work begins to look wasted.
Eventually, you’ll probably have to remove all the plaster from the walls and start from scratch. (If you don’t your walls will dry and the plaster will probably fall to the floor anyway, and that's worse.)
This happens as the wallpaper absorbs all the moisture from the plaster and starts to remove itself from the wall. This is why you need to remove ALL of the paper from your walls.
I know it’s hard work and it’s very boring, but it isn’t worth the trouble it creates in the long run.
2) Wash the walls down
This isn’t always necessary but I personally recommend washing your walls down. The walls in your home can develop grime and dirt. It doesn’t sound like much but I’ll give you an example of where it went very, very wrong for me.
It was a fairly simple job – plastering a ceiling. I prepped the walls and followed all the steps. All except for one – I didn’t wash the ceiling down before I started.
I skimmed the ceiling and it all looked good.
When I returned a few days later, I noticed a large bulge in the middle of the newly plastered ceiling. I looked closer and saw a huge bubble where the plaster hadn’t adhered to the surface. Within two minutes the whole ceiling was on the floor. Disaster!
There was basically a layer of grime that prevented the plaster from sticking to the ceiling. To avoid a situation like this in your house I suggest that you wash your walls down with sugar soap, mixing it with water and applying it to the area you want to work on.
This will remove any grime from the surface and prevent any issues with your plaster. (It seems like a pain but it really does create an ideal base for plastering.)
3) Scrim tape any cracks
Scrim tape is basically a mesh that is often applied between the joints of plaster boards. This allows for natural movement in your home and prevents your plaster from cracking.
If you have any cracks in your walls you should apply scrim tape. If there is any movement and the crack is affected the scrim tape will prevent your finished plaster from being disturbed.
4) PVA
It is standard practice to apply PVA to your walls. As a beginner, it seems a bit strange but this is such a good invention for the world of plastering.
Every wall has its own rate of suction which is basically the amount of moisture a material absorbs. Brick, for example, has a very high rate of suction… if you throw water on brickwork it will literally disappear within 2 minutes. Throw the same amount of water onto an old wall however and the water is hardly absorbed.
If you decide to use normal finish plaster on brickwork, you’ll probably find that the mix soon goes completely solid, and it will eventually crack. This is because the brick has taken all the moisture from the plaster which forced the thistle to crack.
PVA slows the rate of suction making it easier to plaster. If you decided to just start plastering onto a wall without using PVA, the plaster will set at a very fast rate giving you little time to get a decent finish, so it’s worth applying to buy you a little more time to get the results you desire. Another advantage is that PVA helps the plaster bond to the walls.
There are many brands of PVA out there so check with your supplier and always follow the manufacturers instructions. However, as a guide, you will want to mix your PVA with 3 parts water, giving it a good mix and simply roll it all over your walls. It’s not the best job in the world and your hands and arms will probably be covered in PVA glue, but you need to do it.
You will want to mix your PVA with three parts water, giving it a good mix and simply roll it all over your walls. It’s not the best job in the world and I will warn you that your hands and arms will be covered in PVA glue.
You then have to wait for the first coat to dry completely and apply a second coat before you can begin plastering.
Just before it dries completely you may find that the PVA is sticky (which plasterers call “tacky”). This is the moment you want to get your mix on and start throwing your plaster onto the walls. The best time to start skimming is when your walls are slightly sticky, as the plaster binds to the PVA and generally has a better connection to your walls.
The best time to start skimming is when your walls are slightly sticky, as the plaster binds to the PVA and generally has a better connection to your walls.
This is where the 3rd and most important part to plastering comes in.
If you’ve got this far the preparation is over and it’s now time to start skimming.
Finally, the moment you’ve been waiting for: getting that plaster onto your walls.
The first thing we have to discuss is mixing the plaster
I suggest research plaster for the job – it’s a great idea to visit a local paint store or hardware store.
It takes roughly a full bucket of water to 1 bag of plaster. I mix a full bucket of water with an extra litre (roughly 12.5 litres), because I find this gives the best consistency.
Always pour the water in first and add the plaster in parts.
It is best to add a one-third of a bag of plaster first, mix the plaster using the mixer, then add another third whilst mixing.
Finally, throw in the final third and finish mixing.
This prevents any plaster from sticking to the bottom of your bucket whilst getting a decent mix to work with.
Always use clean water and never mix in a dirty bucket because you could risk the plaster setting at a faster rate. You want to aim for the plaster to be at a consistency of melting ice cream and the mix to stay on your bucket trowel without sliding off when held level.
Always check the date of the plaster. If it’s past its sell by date don't use it – there is nothing worse than using a dodgy batch of plaster. Following these simple steps will give you the perfect mix for plastering.
Now you’re ready to go.
There are six steps to plastering:
- 1st coat of plaster
- 2nd coat of plaster
- Flatten your plaster
- 1st trowel over
- 2nd trowel
- Final polish
And now you’re ready to begin!
If, after all of this you really think you can't do your plastering project yourself, give us a call at Painters and Plasterers Newcastle.